Tag Archives: GUI

Dark Fusion Theme for Qt 5

My favorite new theme (for Windows applications, at least) is the Fusion theme that came with Qt 5. I was working on an application recently where the people I was making it for wanted to be able to switch between a lighter and darker theme. Luckily, the Fusion theme uses the applications color palette. I’m putting the code up on Github in a gist, but there won’t be the code to switch between the two themes. I’ll post that later as a quick tip/tutorial.

You can find the theme on Github here. Alternatively, I’m posting the code below in a collapsed code box. Feel free to make changes and submit them back on Github though! You can use this theme in all your applications, but be sure to tell me about them if you can. I’d love to see what people do with it. 🙂

qApp->setStyle(QStyleFactory::create("Fusion"));

QPalette darkPalette;
darkPalette.setColor(QPalette::Window, QColor(53,53,53));
darkPalette.setColor(QPalette::WindowText, Qt::white);
darkPalette.setColor(QPalette::Base, QColor(25,25,25));
darkPalette.setColor(QPalette::AlternateBase, QColor(53,53,53));
darkPalette.setColor(QPalette::ToolTipBase, Qt::white);
darkPalette.setColor(QPalette::ToolTipText, Qt::white);
darkPalette.setColor(QPalette::Text, Qt::white);
darkPalette.setColor(QPalette::Button, QColor(53,53,53));
darkPalette.setColor(QPalette::ButtonText, Qt::white);
darkPalette.setColor(QPalette::BrightText, Qt::red);
darkPalette.setColor(QPalette::Link, QColor(42, 130, 218));

darkPalette.setColor(QPalette::Highlight, QColor(42, 130, 218));
darkPalette.setColor(QPalette::HighlightedText, Qt::black);
    
qApp->setPalette(darkPalette);

qApp->setStyleSheet("QToolTip { color: #ffffff; background-color: #2a82da; border: 1px solid white; }");

Quick Tip: Load Fonts from a Local File with QML

If you are familiar with CSS, you have probably loaded an external font before. With an Internet application, you usually wouldn’t load it from a file, but for a desktop application that doesn’t require an Internet connection, loading from a file is a must. Luckily, this is extremely easy and the TTF file can be embedded right in the executable using the Qt resource system (QRC protocol). In QML, there is a provided FontLoader element that makes quick work of loading fonts. Here’s quick example:

FontLoader { id: myCustomFont; source: "qrc:/fonts/myCustomFont.ttf" }

Note that if you want to do so, it is possible to directly link to a URL on the Internet. However, I wouldn’t recommend this unless you can ensure that your user will have an Internet connection at run-time. Otherwise, I would recommend downloading the TTF file instead and putting it in a local resource file. Be sure to read the license before doing this though!

When you want to use the font later in a font field, for example, you can simply do:

font.family: myCustomFont.name

And that’s it! You are all set to use custom Truetype Fonts in QML! I hope this helps you out with your QML application. Happy coding!

Quick Tip: QProgressBar as a Busy Indicator

This is a super simple tip that doesn’t really have much to it. A busy indicator is just a visual cue to show the user that something is happening. To use a progress bar in Qt as one, you just need to set the minimum and maximum values to 0. If you do this, you get an infinite progress indicator. This is a better alternative to a progress bar when you have a process in which you cannot calculate the percentage completed, or one that takes a really long, undetermined, amount of time. An example with the Fusion style (that I use for basically any QWidgets these days) yields an animated diagonal stitch pattern:

Busy Progress Bar

The Qt Fusion style progress bar.

On Windows 7, you get a nice animated effect as well, but with a smaller colored area moving from left to right infinitely.

Windows 7 Busy Progress Bar

The Windows 7 version of the busy progress bar indicator

I hope the tip helped you out! Happy coding!

Quick Tip: Copy a QPixmap to the System Clipboard in Qt

A few days ago, we went over copying any amount of text to the system clipboard using the system clipboard. However, you can also leverage the full-power of this by copying images and pixmaps to the system clipboard. Let’s get started!

Example UI with Pixmap

Our example UI for this. Simply set a pixmap on a label. along with a button.

Behold my stunning UI for this example. 😛 Now that you have your GUI setup, go to the push button’s slot (or wherever you want to put the code) and you are left with this:

    QClipboard *p_Clipboard = QApplication::clipboard();
    p_Clipboard->setPixmap(*(ui->label->pixmap()));

This is essentially what we did with text, however, with a different method. Note the dereference of the constant pointer we get to the label’s pixmap. This is essential, because the setPixmap() function wants a QPixmap object (taken by reference, not pointer). How can you not love C++? 🙂

Then you can paste it anywhere that lets you insert images through the paste!

The image pasted in MS Word

Here’s the copied pixmap pasted into Word. You can also paste it elsewhere, as long as the form accepts images from the clipboard.

And that about wraps it up. I hope you can use this in one of your projects, and share it if it was useful. Happy coding!

Quick Tip: Copy Any Text to the System Clipboard in Qt

Now, this is a super quick tip, as it’s really a no-brainer. The explanation (if you need one) is that a QApplication has a global instance of the clipboard, which can be accessed by simply getting a pointer to it. So lets just get to the code!

    QClipboard *p_Clipboard = QApplication::clipboard();
    p_Clipboard->setText(textForClipboard);

And viola! Just like that, your text should now be on the system clipboard. Happy coding!

Quick Tip: Using Multiple UI Files in a Qt Application

This is way easier than I first realized with Qt. If you are having troubles figuring this out, do not look any further! Now, it seems I make a habit of trying to figure out how to do things in Qt without consulting my C++ 101 chapters in all those books I read a long time ago. 😛 Every form is a class, (e.g. mainwindow.h/mainwindow.cpp), and if you look in your main function… what does it do? Of course! It just creates an instance and shows it! That easy! Now, there are a few things you can do, but this is the gist of it:

    AboutDialog *aboutDialog = new AboutDialog(this);
    aboutDialog->setAttribute(Qt::WA_DeleteOnClose, true);
    aboutDialog->setFixedSize(aboutDialog->size());
    aboutDialog->open();

Now, this is just some code that I generally use to show a custom about dialog. The main parts you should note are line 1 and 4. On line 1, we instantiate a pointer to an AboutDialog (be sure to include the header file). We use a pointer because, well, if you try using a scoped object, it usually [always] doesn’t work. The dialog simply will disappear because the object is destroyed when it goes out of scope. (Note: this works in main because you have the event loop, i.e. app.exec()).

The middle 2 lines are simply “parameters” I’ve set for this particular dialog. The 2nd line just makes it so the pointer is deleted on closing the dialog. You might not want this if you are using a dialog with data you store in its members. That’s common of a non-modal dialog in my experience. The 3rd line sets the fixed size. This is actually one way to do this, and you can find a plethora of other ways to set a fixed size for your dialog.

The 4th line is rather interesting, as you can change how a window is opened by using either open() or show(). They both yield different results. Basically, open() is just going to open the dialog as a modal dialog, whereas show() is more appropriate for something that’s going to have a longer life-span in the application. I encourage you to play around with this, as it will truly add another layer of depth if you are trying to cram everything into one form! 😉

Quick Tip: Limit Character Count in a QTextEdit

I can think of many instances of where you would want to limit the character count of a text edit. Just recently I used it to keep people from overfilling a field for a database (very important!), but there are several other, practical ways to use this. The code:

    // If the length is greater than 300 characters
    if (ui->plainTextEdit->toPlainText().length() > 300)
    {
        QString text = ui->plainTextEdit->toPlainText();
        text.chop(text.length() - 300); // Cut off at 300 characters
        ui->plainTextEdit->setPlainText(text); // Reset text

        // This code just resets the cursor back to the end position
        // If you don't use this, it moves back to the beginning.
        // This is helpful for really long text edits where you might
        // lose your place.
        QTextCursor cursor = ui->plainTextEdit->textCursor();
        cursor.setPosition(ui->plainTextEdit->document()->characterCount() - 1);
        ui->plainTextEdit->setTextCursor(cursor);

        // This is your "action" to alert the user. I'd suggest something more
        // subtle though, or just not doing anything at all.
        QMessageBox::critical(this,
                              "Error",
                              "Please be sure that you keep the description under 300 characters.");
    }

The best place to put this would be in the textChanged() signal so it checks every time the user updates the text edit. You could also insert it before, say, writing the text out to a file.

Quick Tip: Customize Qt Tooltips with Style Sheets

I’ve been working on an application recently, and I was utilizing a custom version of Qt’s Fusion style. I got the theme looking really sleek, but then I noticed the ugly tooltips. :/ I knew there had to be a way to do this! I spent about 2 minutes thinking and searching the Qt Documentation before I realized that there was such a thing as style sheets in Qt! 😛

It’s one of those things that I had never really used just because I hadn’t bothered. That figures… anyway, style sheets are extremely helpful when you want to customize the look and feel of your application. In this case, we’ll change some attributes of the QToolTip.

    qApp->setStyleSheet("QToolTip { color: #ffffff; background-color: #2a82da; border: 1px solid white; }");

This style results in a tool tip looking something like this:

Custom Tooltip

Create a custom tooltip using Qt Style Sheets

You can certain style it differently using the CSS-like properties. 😉

Quick Tip: Quickly Access All QWidgets in a GUI

The other day, I was trying to change the color palette of all widgets in a GUI application to implement a theme change. I was having problems getting all the widgets to change their palette without having to destroy and re-create the MainWindow. Instead, I found a handy way to easily iterate over all your QWidgets. Enjoy!

        QList<QWidget*> widgets = this->findChildren<QWidget*>();

        foreach (QWidget *widget, widgets)
        {
            widget->setPalette(this->darkPalette);
        }

If you look closely, all we are doing is getting a container of QWidget pointers that contains everything inside the MainWindow (this). We can use the findChildren template function to get all the children that are QWidget pointers. Then we simply use the handy foreach loop to iterate over all these very easily.

Note, you can access all QWidget methods, so this could be very useful for other things besides setting the palette. One example that comes to me off the top of my head is accepting/denying drops. Very handy indeed. 🙂

Quick Tip: Quickly Enable and Disable Widgets in Qt

Today, we’ll look at a quick tip to show you how to use the Qt Creator Signals and Slots editor to add a checkbox that disables/enables widgets on a form. Of course, you could easily do this in code, but this is one of those things that I simply prefer to use the form editor for, since it creates a lot of redundant code in your UI class.

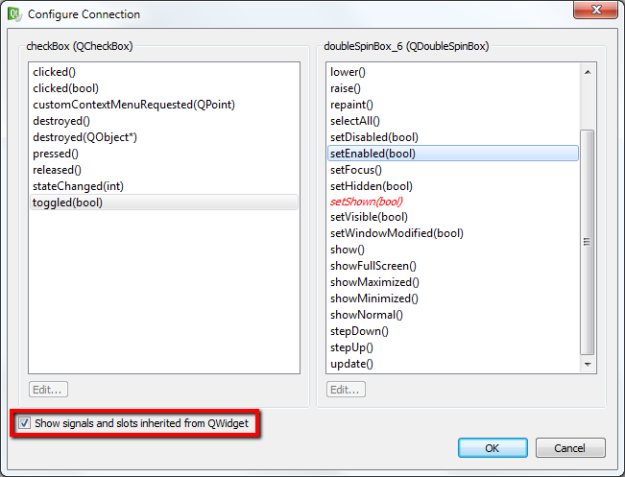
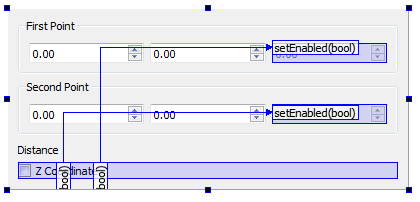
The logic behind it is simple. You have a checkbox toggled(bool) signal connected up to your widget with the setEnabled(bool) slot. First, go to the editor and change it to signals and slots mode. Drag a connection from the checkbox/toggle to the widget(s) you would like to have toggled. When they connect, make sure you have inherited signals/slots checked! You will not get the setEnabled(bool) otherwise.

Configure Connection Dialog

Make sure you have the inherited signals/slots.

Qt Creator Signals/Slots editor

This form totally won’t be used on this blog… 😉

And all this without cluttering your UI class! Below you can see it in action. I would encourage you to play around with some of the other slots, namely setHidden(bool), which might give you a result you are looking for.

Continue reading